
UK Dutyholders: Pick Legionella Sampling Locations From Schematics

Priority sampling locations are sentinel draw-off points, both nearest and furthest from storage, cold-water tanks and calorifiers, and any low-use outlet or dead leg that lets water sit and warm undisturbed. Selection has to be schematic-led, not guessed at, and it has to follow BS 7592 and HSG274/L8. Every sample needs a recorded temperature from a calibrated instrument, and analysis belongs with a UKAS-accredited laboratory.
TL;DR:
Sentinel sampling points must be selected based on pipework schematic positions, focusing on the system’s hydraulic extremities rather than accessible or room-based locations.
Sampling should include points near tanks, calorifiers, showers, and low-use outlets, with a clear distinction between pre-flush and post-flush procedures for accurate interpretation.
Accurate temperature readings and detailed metadata are essential at each sample point, with samples analyzed by an UKAS-accredited laboratory following standardized protocols.
Routine testing frequency varies according to risk assessments, with more frequent samples for problematic or high-risk systems, and quarterly testing for open systems like cooling towers.
Proper documentation of sampling locations, methods, and chain of custody is critical to ensure results are reliable, defensible, and useful for ongoing compliance and investigation purposes.
Table of Contents
Legionella sampling locations: the checklist facilities teams actually need
Getting legionella sampling locations right starts with a simple rule: you sample the system’s hydraulic extremities, not the taps that happen to be easiest to reach. HSE’s own guidance frames this clearly. Sentinel points should represent where water sits longest and cools or heats the slowest, which is precisely where Legionella gets the chance to establish itself.
Here’s the list that should form the backbone of any sampling round, cold and hot systems included.
Near sentinel, cold system: the tap or outlet closest to the incoming mains or storage tank, used as a baseline reference for supply quality.
Far sentinel, cold system: the outlet furthest from the tank or main, typically at the top floor or the end of a long branch, where stagnation risk peaks.
Storage cold-water tanks: sampled directly, since tanks are where sediment, biofilm and warm ambient temperatures create ideal breeding conditions.
Hot water calorifier connections: both the flow leaving the calorifier and the return, which shows whether the heat source is actually achieving disinfection temperatures.
Unvented cylinders: sampled at the outlet nearest the cylinder and at the furthest point served by it, mirroring the cold-system logic.
Showers and spray outlets: high priority because aerosol generation is the main route of human exposure, and these outlets often have complex internal fittings that trap water.
Ice-makers and other water-fed appliances: frequently overlooked, yet they draw from the same network and can harbour biofilm in internal tubing.
Infrequently used outlets: storerooms, empty offices, seasonal plant rooms. Water that stands for days is exactly the stagnant water HSG274 warns about.
Points before and after water softeners: softening changes water chemistry and can affect disinfectant residuals, so sampling on both sides shows whether the softener itself is contributing to risk.
TMV outlets, sampled with an upstream temperature check: the mixed output temperature tells you little on its own, so pairing it with the upstream hot supply reading is essential for interpretation.
A few of these deserve more attention than a bullet point gives them. Calorifier connections are routinely under-sampled because engineers assume the plant room reading covers it, but a flow sample tells you what’s leaving the vessel while a return sample tells you what the system is sending back after travelling through pipework. The gap between the two numbers is often the most useful diagnostic information you’ll get.
Spray outlets and showers also deserve a second look, not just because they aerosolise water but because their internal components (flow restrictors, rubber washers, shower hoses) are common colonisation sites that a straightforward tap sample won’t reflect unless the outlet fitting itself is swabbed or the biofilm sampled separately. Where a site has communal or accessible shower facilities, such as in hotels or leisure venues, coordinating outlet hardware with a bathroom fittings partner can reduce the number of trap points a sampling plan has to account for in the first place.
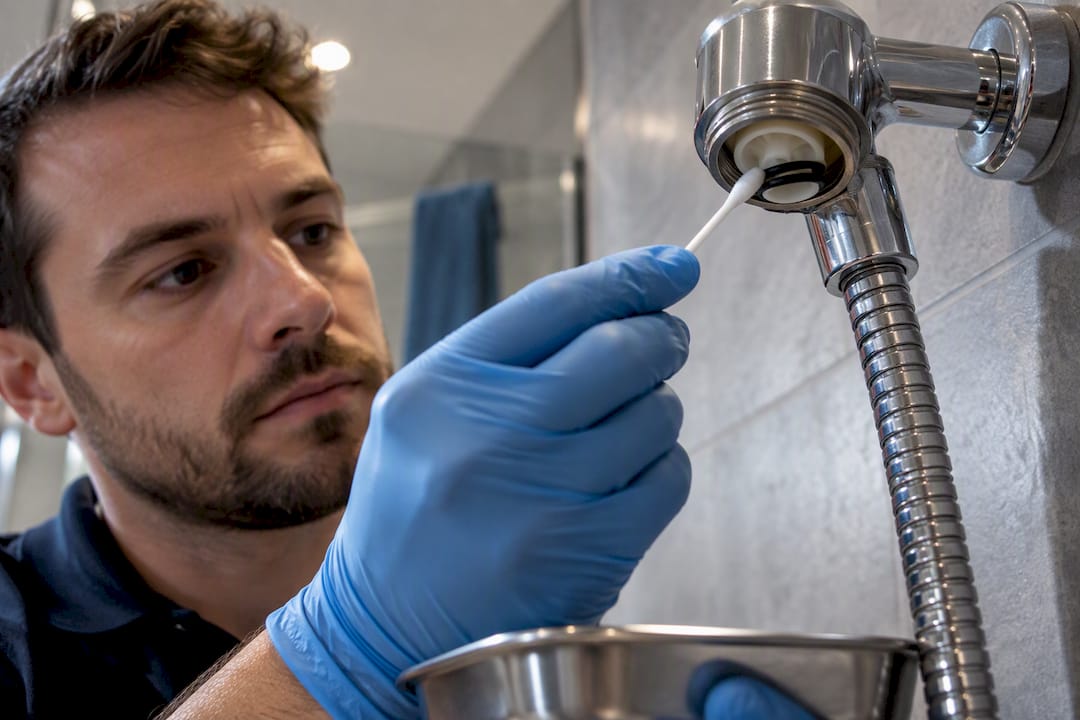
Softener sample points get missed almost as often. If a softener is failing or bypassing intermittently, a single post-softener sample won’t tell you that. Pairing pre- and post-readings, ideally on the same visit, catches the kind of intermittent fault that a one-off test would miss entirely.
Selecting sentinel outlets by system type using schematics
You cannot pick sentinel points from a floor plan or a room list. You need the pipework schematic, because sentinel selection depends entirely on hydraulic position, not on which room looks important or which tap is nearest the door.
Start with a simple cold-water system. Trace the pipe run from the incoming main or storage tank to its furthest point. The near sentinel sits closest to that source; the far sentinel sits at the true hydraulic end of the run, which is usually the top floor or the longest branch, not necessarily the outlet that’s physically furthest away in metres.
Move to a non-circulating hot-water system. The same near/far logic applies, but measured from the calorifier or water heater rather than the tank. HSE guidance notes that branched hot systems need an additional far sentinel at the end of any significant spur, since a branch running off the main hot circuit behaves like its own separate system for sampling purposes.
Handle branched systems by treating each branch on its own merits. A spur serving a single storeroom tap still needs its own far sentinel if that tap sits at genuine hydraulic distance from the source, even if the branch itself is short.
For circulating systems, sample at the riser returns as well as the flow. Multi-storey buildings with circulating hot water typically have a flow and return pipe running the height of the building. Sampling only the flow misses what’s happening on the return leg, where slower circulation and heat loss are most likely.
In multi-floor buildings, treat each riser as its own mini-system. A twelve-storey block might need sentinel points on several risers, not just one per building, because water travelling up one riser doesn’t tell you anything about a different riser on the other side of the building.
Cross-check every outlet against the schematic before finalising the list. This is the step most commonly skipped, and it’s where errors creep in. An outlet labelled as “furthest” on a room plan might actually sit on a short branch close to the source once you trace the actual pipe run.
Mark any section of pipework with no representative sentinel and add one. If the schematic shows a length of pipe that no existing sample point covers, that’s a gap, not a detail to note for next time.
The core lesson here is one HSE returns to repeatedly: a sampling point only has value if it represents the system hydraulically. Picking outlets by convenience or room name, rather than pipe position, produces data that looks thorough but tells you almost nothing reliable.
Pre-flush, post-flush, biofilm: what each sample type actually tells you
The method behind a sample matters as much as its location, because pre-flush and post-flush samples answer two different questions and mixing them up in a trend report muddies the picture badly.
Pre-flush sampling takes water exactly as it comes out of the tap, with no running the outlet first. This reflects what a person would actually be exposed to if they turned that tap on, which is why Scottish infection-prevention guidance recommends it as the default for routine monitoring rounds unless a site’s infection-control team advises otherwise. It’s the closer proxy for real-world risk.
Post-flush sampling involves running the outlet for a set period, usually a few minutes, before taking the sample. This clears out water that’s been standing in the outlet fitting itself and gives you a reading closer to what’s circulating in the wider system upstream. It helps distinguish whether contamination is confined to that one tap’s fittings or reflects colonisation further back in the pipework.
Running both types on the same outlet without a clear labelling system is where most interpretation errors happen. A high pre-flush reading paired with a clean post-flush result points to something local, a fouled washer or flow restrictor, rather than a system-wide problem. Get the labelling wrong and you’ll chase the wrong fault.
Biofilm and sediment sampling comes into play during investigations rather than routine rounds. BS 7592:2022 sets out separate procedures for this, since biofilm sits on internal surfaces rather than in the bulk water and needs swabbing or scraping rather than a simple water grab. It’s typically reserved for outbreak investigations or when repeated water samples come back inconclusive despite an outlet’s known history of poor temperatures.
A few practical points that save headaches at the lab end:
Use the sterile bottles supplied by your laboratory, which usually already contain a neutraliser to stop any disinfectant residual killing bacteria in transit.
Never substitute a bottle from a different supplier without checking it contains the correct neutraliser for the disinfectant in use on site.
Label every sample with its type (pre-flush, post-flush, biofilm) clearly on the bottle, not just on a separate sheet that can get separated in transit.
Follow the laboratory’s specific instructions for fill level and cap tightness. Under-filled bottles can affect dilution calculations.
Get the sample type wrong on the label and even a technically perfect result becomes useless, because nobody downstream can tell what it actually represents.
What to record at every sample point
A water sample without a temperature reading and a full metadata record is close to worthless for compliance purposes, because a lab result on its own can’t tell you whether an outlet is failing on temperature, on flow, or on something else entirely.
Pro Tip: Carry a stopwatch you trust, not your phone’s timer app buried three menu taps deep. In a plant room under time pressure, thirty seconds fumbling for a screen is thirty seconds your temperature reading is drifting.
What the guidance actually requires: hot water should reach 55°C within one minute of running the tap, and cold water should sit at or below 20°C after running for two minutes, measured with a calibrated probe and a calibrated stopwatch. For TMV-fed outlets, take the reading upstream of the mixing valve, since the blended output temperature at the tap tells you nothing about whether the hot supply feeding it is actually hot enough.
Beyond temperature, every sample needs a consistent record attached to it:
Outlet identity and location code, matched to the schematic reference, not a room name alone.
Whether the outlet is hot, cold, or mixed (TMV), and which sentinel category it falls under.
Sample method: pre-flush or post-flush, stated explicitly.
Usage condition at the time: was the outlet in regular use, or had it been standing idle?
Date, time and sampler identity, so any anomaly can be traced back to a specific visit and person.
Disinfectant residual reading, where the system uses chlorine dioxide or a similar treatment, taken at the same time as the water sample.
Storage and transport notes: samples should be kept out of direct light, at ambient temperature, and returned to the laboratory the same day or within 24 hours to avoid degradation affecting the result.
Missing even one of these fields turns a otherwise solid sample into a data point nobody can properly act on six months later when you’re trying to spot a trend. Automated systems can help close this gap. Automated temperature monitoring logs outlet temperatures continuously between sampling rounds, which fills in the picture between visits rather than relying solely on point-in-time readings.
How often you should be testing, and what changes that
Routine culture sampling isn’t automatic. It’s driven by the risk assessment, and plenty of well-managed systems with good temperature control and low occupancy never need routine culturing at all. Testing for the sake of testing wastes budget and can generate false reassurance if it’s not tied to an actual risk finding.
That changes the moment something goes wrong, or when a system falls into a higher-risk category by design.
Routine monitoring applies where the risk assessment specifically calls for it, often on systems with a known history of temperature problems, complex pipework, or vulnerable occupants such as care settings.
Investigation sampling ramps up sharply. Add targeted points beyond the usual sentinels, sample weekly in the affected zone, and wherever possible collect samples before any disinfection or pasteurisation so you’re testing the untreated condition, not a system you’ve already cleaned.
Open systems such as cooling towers and spa pools carry a different tempo entirely, usually needing testing quarterly or more often given how quickly biofilm and scale can build in these systems compared with closed potable networks.
System history matters as much as system type. A calorifier that’s previously failed temperature checks warrants closer attention than an identical unit with a clean record, regardless of what a generic schedule might suggest.
The occupant profile shifts the calculation too. A care home or hospital ward with immunocompromised residents justifies a tighter sampling interval than an office with a healthy working-age population, even where the plumbing itself is near identical. BS 7592 draws this distinction explicitly: routine monitoring uses planned, representative locations, while an outbreak or suspected case demands additional targeted points that a standard schedule simply wouldn’t include.
Getting the paperwork right: schematics, labs and chain of custody
Sampling only produces useful evidence when it’s repeatable, and repeatability comes down almost entirely to documentation. A perfect sample with no paper trail behind it is close to useless if you ever need to defend your compliance position.
Keep the schematic current. Every refurbishment, new outlet, or removed pipe run changes the hydraulic map, and a schematic drawn five years ago won’t reflect a system that’s had three office fit-outs since.
Assign precise location codes to every sentinel and sample point. A code tied to the schematic reference beats a room name every time, because room names change with tenancy while pipework position doesn’t.
Choose a laboratory that holds UKAS accreditation and participates in a water microbiology proficiency scheme. This isn’t a nice-to-have detail buried in small print. It’s the standard HSE points to directly when describing what counts as reliable testing.
Record the full chain of custody for every sample: sampler name, date, time, sample ID, temperature at the point of sampling, and whether it was pre-flush or post-flush.
Follow BS 7592’s container and handling specifications precisely. The standard sets out which container types suit which sample purposes, and deviating from that guidance can invalidate a result even when the underlying water quality was fine.
Retain records for repeat comparison. A single result tells you almost nothing on its own. A record you can compare against six months of history tells you whether an outlet is stable, improving, or drifting toward a problem.
HSE also notes that the theoretical detection limit for standard culture methods sits around 100 Legionella organisms per litre, a figure worth knowing because it means a “not detected” result doesn’t guarantee zero organisms present, only that levels sit below what the method can reliably pick up. That nuance matters when you’re interpreting a borderline system against an apparently clean report.
The mistakes practitioners make, and how to avoid them
The same errors turn up across sites of every size, and nearly all of them trace back to skipping the schematic step.
The most common is choosing outlets by room name rather than pipe position. A tap labelled “far corner office” might sit on a short branch close to the riser, while the genuinely furthest point in hydraulic terms is a store cupboard nobody thought to check. Verifying hydraulic extremities against the schematic before fixing sentinel points catches this before it becomes a pattern across every future round.
The second mistake is mixing pre-flush and post-flush results in the same trend line without flagging which is which. A trend that looks like it’s worsening might just be a switch in method between visits, not an actual change in water quality.
The third is sampling only the busiest, most convenient outlets because they’re quick to reach. This produces tidy-looking reports that miss exactly the low-use, stagnant points where risk concentrates.
Map every outlet to the schematic before finalising a sampling round, not after.
Rotate less critical or clinical outlets between rounds for coverage, but keep a fixed set of ancillary sentinels constant so you can actually trend them over time.
Plan access, permits and height-safety arrangements for tank and roof-level sampling well before the visit, since last-minute access problems are how far sentinels get quietly dropped from a round.
Label every bottle with sample type and location code before it leaves the site, not once you’re back at the desk trying to remember which was which.
A bespoke sampling plan that documents these choices properly, which points are fixed, which rotate, and why, tends to reduce unnecessary repeat testing over time while actually improving how quickly a genuine problem gets spotted, because you’re comparing like with like round after round instead of chasing noise.
Why representative sampling beats convenient sampling
False reassurance is the real cost of sloppy sentinel selection. A round that samples five easy taps and comes back clean tells you nothing about the dead leg behind the store cupboard nobody’s touched in three months, and that’s precisely where problems tend to surface later, usually at the worst possible time.
Bespoke sampling plans exist because no two buildings share an identical pipework layout, even within the same estate. A schematic-led approach means every sentinel point earns its place for a documented reason, not because it happened to be nearest the door. Clients working with Bespokecompliancesolutions typically get a site survey, an updated schematic, and a sampling schedule that reflects the building as it actually is now, not as it was drawn a decade ago.
Getting this right the first time avoids the far costlier alternative: unnecessary remedial works triggered by a misleading result, or worse, a genuine risk missed because nobody sampled the point that mattered.
— Sammi
Book a bespoke sampling plan and UKAS lab coordination
Some providers build sampling plans around your actual pipework, not a generic template, which means fewer wasted samples on outlets that never needed testing and better odds of catching a genuine problem at the point where it starts. That’s the practical difference between a schematic-led plan and a round that just hits the nearest taps.
[
A typical engagement runs through a clear sequence: a site survey to walk the building, a schematic review to confirm sentinel points against actual pipework, a sampling schedule built around your risk profile, then sample collection and analysis coordinated with a UKAS-accredited laboratory, followed by a report with remedial recommendations where results warrant them. Alongside sampling itself, Bespokecompliancesolutions offers legionella risk assessments starting from £185 one-off to establish or refresh the schematic that sentinel selection depends on, plus TMV servicing and remedial works where a sample flags a fault that needs fixing rather than just monitoring.
If you need a full water testing service, legionella water testing and analysis starts from £55 one-off per sample, covering everything from routine sentinel samples through to pseudomonas and TVC testing where a site’s water use profile calls for it. Get in touch to arrange a site survey and a sampling schedule built around your actual building.
Standards and guidance worth keeping on file
Four sources should sit permanently on any compliance manager’s desk when building or reviewing a sampling plan.
BS 7592 is the code of practice covering sample-site selection, container types and procedures for both routine monitoring and investigations, including biofilm and sediment sampling.
HSG274 and L8 set out the risk-assessment framework that determines whether routine sampling is needed at all, and how sentinel points should be chosen to represent a system hydraulically.
UKHSA guidance on investigating water systems covers what changes during an outbreak investigation, including timing samples before disinfection.
HSE maintains the core practical guidance on testing and monitoring, including laboratory accreditation requirements and detection limits. Always confirm your chosen laboratory holds current UKAS accreditation before submitting samples.
This article is general information, not a substitute for advice from a qualified doctor. Consult a qualified healthcare professional about your own circumstances before acting on anything here.
Sources
FAQ
What is the protocol for sampling for Legionella?
The protocol means selecting sentinel outlets that represent the system hydraulically, near and far points, storage tanks, calorifier connections, then sampling to BS 7592 procedures with a UKAS-accredited laboratory analysing results. Temperature must be recorded at every point using a calibrated probe.
How often should Legionella be sampled?
Frequency depends entirely on what the risk assessment finds. Not every system needs routine culture testing, but investigation sampling intensifies to weekly rounds in affected areas, and open systems like cooling towers typically need testing quarterly or more often given how quickly biofilm builds in them.
What is the British standard for sampling for Legionella?
BS 7592:2022 is the current British Standard, covering sample-site selection, container specifications and procedures for both routine monitoring and outbreak investigations, including biofilm sampling.
How do I sample water for Legionella testing?
Take pre-flush samples straight from the tap without running it first for routine monitoring, or post-flush samples after running the outlet for a few minutes when investigating system-wide colonisation. Record the temperature at the point of sampling and label the bottle clearly with sample type, location code and time before sending it to a UKAS-accredited laboratory.
What temperature should hot and cold water reach during sampling?
Hot water should reach 55°C within one minute of running the tap, and cold water should sit at or below 20°C after two minutes, measured with a calibrated probe and stopwatch. For TMV outlets, take the reading upstream of the mixing valve rather than at the blended tap output.
Recommended
Comments